Making your own miniatures - Basics and tips
(this page was actually written last year - just forgot to publish it....)Filling a dollhouse can soon become a costly hobby. While it's nice to have quality items made by professional artisans, there are lot of things you can make yourself and save money for that exclusive item you saw at the latest fair.
Making miniatures is fun and does not necessarily require special skills, you learn by doing. Recycling bits and bobs that you normally throw in the bin without thinking, gluing them together and painting them with acrylic or nail polish, you can come up with great stuff. Plus the satisfaction of having unique pieces, made by you, just as you imagined them. Of course, at first your items many not come out the way you wanted, but using recycled things, you can make it again until you are satisfied.
All you need is: some basic tools, some research (there are thousands of tutorials on internet), patience and imagination. Skills will come with practice.
When you start collecting small little things, pretty soon you have a whole bunch of things that can be used. Ideally, keep 2 of the same items so that if the miniature you are making turns out to be a failure, you can start over having learned from your mistakes (well, hopefully). Recycle chopsticks (for furniture legs) and wooden stirrers (for floorboards) from take-aways and ask your friends to keep them for you. Wash them (dont' soak them) in soapy water, rinse and let dry.
Tell your friends you are collecting these little things, and that you'll happily rid them of their broken jewelry, nail polish they no longer like to color of, etc. they'll be glad to give you their findings.
Keep some cardboard boxes from your last purchase, some of it can become a room box, furniture, or protect your working space.
Sometimes you will need bits which you don't have. Start by asking around, someone might have just the piece you need. Or wait a week and it might turn up among all the waste we produce every day. While shopping, check out the stores that sell cheap things, they often have items that cost no more than 1-2 euros (cheap jewellry, scrapbook stuff, little boxes, a set of acrylic paint, cheap nail polish, small strings of Christmas led lights, etc.)
For fabrics, go to your local fabric store, when they change their collection, they throw away the samples. That's how I got a piece of faux-leather large enough to make club chairs and even a sofa, for free.
Charity shops are also good places to find little treasures. (I found some great pieces on my last trip to England). One of them even had a vintage Lundby dollhouse which, regretfully, I could not buy as I could not carry it back to Belgium.
As to the basic tools: you can start with a craft knife (with spare blades, you'll need to change them regularly), a pair of craft scissors (seamstress scissors with small points and slightly curved can be very useful), jewelers' tongs, tweezers, small rubber bands (to hold pieces together), all-purpose glue, a sheet of small grain sanding paper (nail files can sometimes do the job too).
I also use small hem clips to press little parts together while they dry.
For cutting fabric and leather, I recommend using specific fabric scissors. Do not use those to cut paper, you'll ruin them.

For more elaborate miniatures, you will get better results with the proper tools. Miniatures require small tools. A basic Dremmel or Proxxon multi-purpose tool is a good investment and you won't really need much else. You can buy more accessories later on if needed.
To make furniture, you can use foamboard or balsa wood. I tried foamboard (the club chair), but the problem is gluing the sides where the foam is not covered. Balsa wood is a good option. It can easily be cut with a craft knife, painted or stained and keep a wooden look and texture,except cutting curves which I have not yet managed with a craft knife.
For the measurements, look for a similar item in your own home and divide the measurements by 12 for 1:12 scale or 24 for 1:24.
The difficult part in making furniture is to figure out what pieces you need and cut with precision all the little bits that will need to be assembled sothat they fit together well. First, make a sketch of the item you want to make, then draw all the pieces you will need, on cardstock or cereal box cardboard, mark each piece with a letter and indicate measurements. Photocopy that (does Ikea ring a bell?). Then cut the cardboard to make the templates of the pieces you need. Dry fit with masking tape (which can easily be removed). Adjust with scissors if necessary. When you are happy that all the pieces are as they should be, trace the pieces onto balsa wood. I know, it's twice the work, but well worth it. Not only can you be sure that all your balsa pieces will fit nicely together, having a template you'll be able to make the same item again and again, and you can also use some of the template pieces to make other items.
I recommend cutting the balsa just outside the line you traced, put the template on top of the balsa and sand it to the exact size.
Keep the templates in envelopes together with the photocopy you made and make a rough sketch of the item on the envelope (beats any description....).
Always dry fit before gluing, using PVA or wood glue. Use as little glue as possible, and make sure to wipe the excess glue immediately as paint and varnish will not adhere to the glue, which will show on the finished piece.
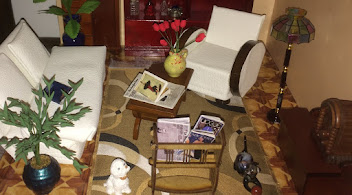
Below are examples of things I made with recycled materials, cheap buys and basic tools.
Originally, I had intended to add tutorials, but they are so many no internet already (good ones too), there is just no point and no added value.
For more items, check out this page: Items home made
A stove for the kitchen
.
made with this:

the kitchen water boiler
made from cardstock, 2 wooden balls, thick wire and pearls. The taps are from the bathroom set I bought as I intend to change the ones on the bathtub. I used white acrylic paint and nail polish to give it the shiny metallic look.
Floorboards
I used coffee wooden stirrers, but I did not have the patience to wait until I had collected enough, so I bought a box (6 euros for a box of 1000 - that's a lot of flooboards!). The downside is: they were cheap but irregular, sometimes bent.You can of course buy professionally made floorboards, but that will cost you.
If you use my option, you'll need to be careful to check the alignment regularly and adjust as necessary, otherwise when you reach the end of your floor, you'll notice it's not straight (talking from experience here!). You'll need good cutting pliers to cut them and wood glue.
Don't start gluing them straight on your dollshouse floor in a wave of enthusiasm, start by making a template of the floor with cardstock (cereal box cardboard is a good choice). It will be much easier to work with. And if it turns out to be a disaster, you have a chance to start over.
DON'T START LIKE THIS:

DO THIS:

If, like in my house, you have a curved side, glue one bit at a time and cut each one as you go along, otherwise you'll need to saw the finished thing (and good luck with that!)
I decided to make the floorboards in two parts (wise decision) and below is the left part finished - notice the problem on the right hand side? the floorboards don't align with the template.... I had to make adjustments on the second part.

When you have finished gluing the floorboards onto the cardboard, leave to dry a couple of days with heavy books on top so it will remain flat. Sand it by hand with small grain sanding paper. If you use a machine, don't overdo it, the wood is not very thick. Remove the dust with a vacuum cleaner, and then with a soft brush. Stain/varnish if you wish. I used dark wood stained varnish to do both in one go (2 coats).
Dry fit the flooboards and check it fits perfectly before gluing in place.
I will be adding skirting boards to hide the irregular borders and give it a nice finished look.
And here is the result: funnily enough, the connection between the two parts is very visible on the picture below, not so when you look at the real thing, go figure!

No comments:
Post a Comment